- Introduction
- Before you begin
- Step one: Access the HP Embedded Web Server (EWS)
- Set up Save to Network Folder
This document explains how to enable and configure the Scan to Network Folder function. The product has a feature that enables it to scan a document and save it to a network folder. To use this scan feature, the product must be connected to a network; however, the feature is not available until it has been configured. There are two methods for configuring Scan to Network Folder, the Save to Network Folder Quick Set Wizard for basic setup and Save to Network Folder Setup for advanced setup.

NOTE:To set up the Scan to Network Folder feature, the product must have an active network connection.
Administrators need the following items before beginning the configuration process.
- •
- •

NOTE:The network folder must be set up as a shared folder for the Scan to Network Folder feature to work. For more information about setting up a shared folder, see Set up a shared folder (c04431534).
- 1.
- 2.
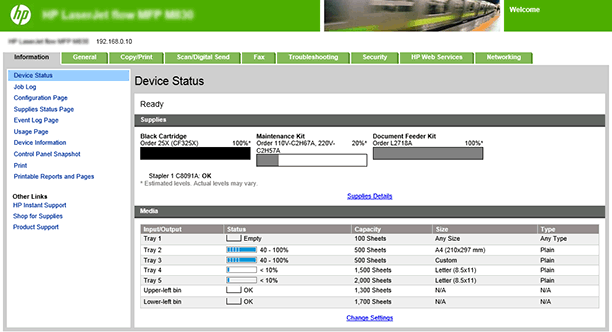
Open a Web browser, and in the address line, type the IP address or host name of the printer exactly as it displays on the printer control panel. Press the Enter key on the computer keyboard. The EWS opens.


NOTE:If the Web browser displays a message indicating that accessing the website might not be safe, select the option to continue to the website. Accessing this website will not harm the computer.

This option opens the setup wizard that is in the HP Embedded Web Server (EWS) for the product. The setup wizard includes the options for basic configuration.

TIP:Before you begin: To display the printer's IP address or host name, touch the Network  button on the printer's control panel.
- 1.
- 2.
- 3.
On the Add or Remove a Save to Network Folder Quick Set dialog, click Add.

NOTE:Quick Sets are short-cut jobs that can be accessed on the product Home screen or within the Quick Sets application.

NOTE:The Save to Network Folder feature can be minimally configured without creating a quick set. However, without the quick set, users must enter the destination folder information at the control panel for each scan job. A quick set is required to include Save to Network Folder metadata.
- 4.
- 5.
On the Configure Destination Folder dialog, complete the following information:
- a.
In the UNC Folder Path field, type a folder path where the scan will go.
The folder path can either be the fully-qualified domain name (FQDN) (e.g., \\servername.us.companyname.net\scans) or the IP address of the server (e.g., \\16.88.20.20\scans). Be sure that the folder path (e.g., \scans) follows the FQDN or IP address.

NOTE:The FQDN can be more reliable than the IP address. If the server gets its IP address via DHCP, the IP address can change. However, the connection with an IP address might be faster because the product does not need to use DNS to find the destination server.
- b.
- c.
- d.
- a.
- 6.
- 7.
- 8.
This option enables advanced configuration of the Save to Network Folder feature using the HP Embedded Web Server (EWS) for the product.

TIP:Before you begin: To display the printer's IP address or host name, touch the Network  button on the printer's control panel.
- Step one: Begin the configuration
- Step two: Configure the Save to Network Folder settings
- Step three: Complete the configuration
- 1.
- 2.
- 1.
- 2.
In the Quick Sets area, click Add. The Quick Set Wizard opens.

NOTE:Quick Sets are short-cut jobs that can be accessed on the product Home screen or within the Quick Sets application.

NOTE:The Save to Network Folder feature can be minimally configured without creating a quick set. However, without the quick set, users must enter the destination folder information at the control panel for each scan job. A quick set is required to include Save to Network Folder metadata.
Complete all of the dialogs in the Quick Set Wizard to fully configure the Save to Network Folder feature.
- Dialog one: Set the button location for the Quick Set and options for user interaction at the control panel
- Dialog two: Folder Settings
- Dialog three: Notification settings
- Dialog four: Scan Settings
- Dialog five: File Settings
- Dialog six: Summary
Dialog one: Set the button location for the Quick Set and options for user interaction at the control panel
Use the Set the button location for the Quick Set and options for user interaction at the control panel dialog to configure where the Quick Set button will display on the product control panel and to configure the level of user interaction at the product control panel.
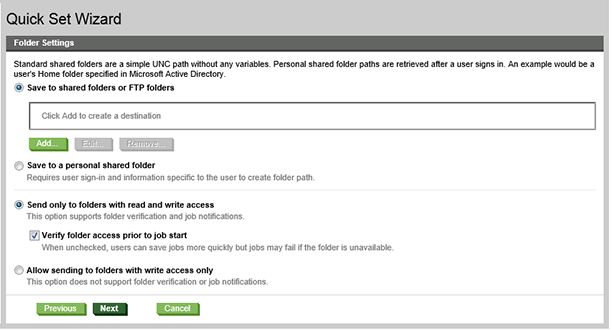
Use the Folder Settings dialog to configure the types of folders the product sends scanned documents to.
There are two types of destination folders to select from:
- •
- •
There are two types of folder permissions to select from:
- •
- •
The following information describes how to configure the folder settings.

This section provides information about the following topics:
Option 1: Shared folders or FTP folders
To save scanned documents to a standard shared folder or an FTP folder, complete the following steps:
- 1.
- 2.
- 3.
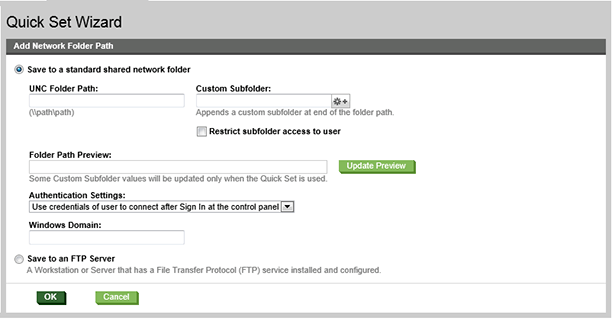
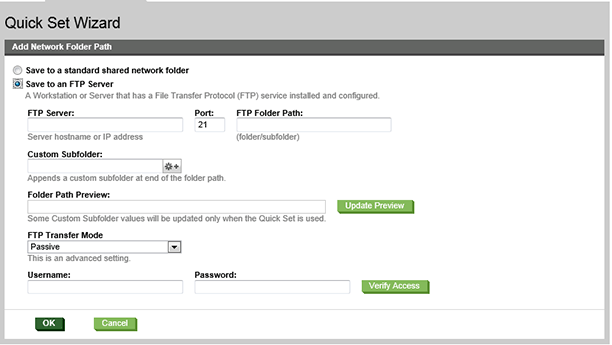
On the Add Network Folder Path dialog, select one of the following options:
- •
Option one: Save to a standard shared network folder


NOTE:For more information about creating shared network folders see Set up a shared folder (c04345591).
- 1.
- 2.
In the UNC Folder Path field, type a folder path.
The folder path can either be the fully-qualified domain name (FQDN) (e.g., \\servername.us.companyname.net\scans) or the IP address of the server (e.g., \\16.88.20.20\scans). Be sure that the folder path (e.g., \scans) follows the FQDN or IP address.

NOTE:The FQDN can be more reliable than the IP address. If the server gets its IP address via DHCP, the IP address can change. However, the connection with an IP address might be faster because the product does not need to use DNS to find the destination server.
- 3.
- 4.
- 5.
- 6.
In the Windows Domain field, type the Windows domain.

TIP:To find the Windows domain in Windows 7, click Start, click Control Panel, click System.
To find the Windows domain in Windows 8, click Search, enter System in the search box, and then click System.
The domain is listed under Computer name, domain, and workgroup settings.

NOTE:If a shared folder is set to be accessed by everyone, values for a workgroup name (default is “Workgroup”), a user name and password must be entered in the corresponding fields. However, if the folder is within a particular user’s folders and not Public, the user name and password of that user must be used.

NOTE:An IP address might be necessary instead of a computer name. Many home routers do not handle computer names well, and there is no Domain Name Server (DNS). In this case, it is best to set up a static IP address on the shared PC to alleviate the problem of DHCP assigning a new IP address. On a typical home router, this is done by setting a static IP address that is on the same subnet, but outside the DHCP address range.
- 7.
- •
- •
Option 2: Personal shared folders
To save scanned documents to a personal shared folder, complete the following steps:

NOTE:This option is used in domain environments where the administrator configures a shared folder for each user. If the Save to a personal shared folder feature is configured, users will be required to sign in at the product control panel using Windows credentials or LDAP authentication.
- 1.
- 2.
- 3.
Option 1: Read and write access
To send scanned documents to a folders configured for read and write access, complete the following steps:

NOTE:Send only to folders with read and write access supports folder verification and job notification
- 1.
- 2.
- 3.
To send scanned documents to a folder configured for write access only, complete the following steps:

NOTE:Allow sending to folders with write access only does not support folder verification or job notification

NOTE:If this option is selected, the product cannot increment the scan filename. It sends the same filename for all scans.
Select a time-related filename prefix or suffix for the scan filename, so that each scan is saved as a unique file, and does not overwrite a previous file. This filename is determined by the information in the File Settings dialog in the Quick Set Wizard.
- 1.
- 2.
- ▲
On the Notification Settings dialog, complete one of the following tasks:

NOTE:In order to send notification emails, the product must be set up to use an SMTP server for sending email jobs. For more information about setting up the SMTP server for sending emails see Set up Scan to Email (c04017973).
On the Scan Settings dialog, set the default scanning preferences for the Quick Set, and then click Next.
On the File Settings dialog, set the default file settings for the Quick Set, and then click Next.
On the Summary dialog, review the Summary dialog, and then click Finish.
- ▲
