Set up Scan to Email using the HP Embedded Web Server (EWS)
The printer has a feature that enables it to scan a document and send it to one or more email addresses. To use this scan
feature, the printer must be connected to a network; however, the feature is not available until it has been configured. There
are two methods for configuring Scan to Email, the Scan to Email Setup Wizard for basic and "Email Setup" for advanced. Use the following information to set up the Scan to Email feature.
To set up the Scan to Email feature, the printer must have an active network connection.

Administrators need the following information before beginning the configuration process:

IMPORTANT:Consult your e-mail service provider's documentation for information on digital sending limits for your e-mail account. Some
providers may temporarily lock your account if you exceed your sending limit.
Step one: Access the HP Embedded Web Server (EWS)
- 1.
From the Home screen on the printer control panel, touch the Network  button to display the IP address or host name.
- 2.
Open a Web browser, and in the address line, type the IP address or host name of the printer exactly as it displays on the
printer control panel. Press the Enter key on the computer keyboard. The EWS opens.

NOTE:If the Web browser displays a message indicating that accessing the website might not be safe, select the option to continue
to the website. Accessing this website will not harm the computer.
Step two: Configure the Network Identification settings
NOTE:Configuring e-mail setup on the Networking tab is an advanced process and might require the assistance of a system administrator.
- 1.
Using the EWS top navigation tabs, click Networking.
- 2.
In the left navigation pane, click TCP/IP Settings. A username/password might be required to access the Network Identification tab of the EWS.
- 3.
On the TCP/IP Settings dialog, click the Network Identification tab.
- 4.
If DNS is required on the network, in the TCP/IP Domain Suffix area, verify that the DNS suffix for the e-mail client being used is listed. DNS suffixes have this format: companyname.com, gmail.com, etc.

NOTE:If the Domain Name suffix is not set up, use the IP address.
- 5.
- 6.
Step three: Configure the Send to E-mail feature
The two options for configuring Send to e-mail are the E-mail Setup Wizard for basic configuration and E-mail Setup for advanced configuration. Use the following options to configure the Send to e-mail feature:
Method one: Basic configuration using the E-mail Setup Wizard
This option opens the E-mail Setup Wizard in the HP Embedded Web Server (EWS) for basic configuration.
- 1.
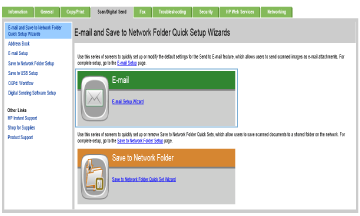
Using the EWS top navigation tabs, click Scan/Digital Send.
- 2.
In the E-mail and Save to Network Folder Quick Setup Wizards area, click the E-mail Setup Wizard link.
- 3.
On the E-mail Setup Wizard dialog, click Continue to proceed with the configuration.
- 4.
On the Configure E-mail Servers (SMTP) dialog, select one of the following options and complete the steps:
Option one: Use a server already in use by E-mail
a. Select Use a server already in use by E-mail, and then click Next.
Option two: Search network for outgoing e-mail server
NOTE:This option finds outgoing SMTP servers inside your firewall only.
- a.
Select Search network for outgoing e-mail server, and then click Next.
- b.
Select the appropriate server from the Configure E-mail Server (SMTP) list, and then click Next.
- c.
Select the option that describes the server’s authentication requirements:
- •
Server does not require authentication: Select Server does not require authentication, and then click Next.
-OR-
- •
Server requires authentication: From the drop-down list, select an authentication option:
- •
Use credentials of user to connect after Sign In at the control panel: Select Use credentials of user to connect after Sign In at the control panel, and then click Next.
-OR-
- •
Always use these credentials: Select Always use these credentials, enter the User name and Password, and then click Next.
Option three: Add SMTP server
- a.
- b.
Enter the Server Name and Port Number, and then click Next.
NOTE:In most cases, the default port number does not need to be changed.
NOTE:If you are using a hosted SMTP service such as Gmail, verify the SMTP address, port number, and SSL settings from the service
provider’s Web site or other sources. Typically, for Gmail, the SMTP address is smtp.gmail.com, port number 465, and the SSL
should be enabled.
Please refer to online sources to confirm these server settings are current and valid at the time of configuration.
- c.
Select the appropriate server authentication option:
- •
Server does not require authentication: Select Server does not require authentication, and then click Next.
-OR-
- •
Server requires authentication: Select an option from the Server requires authentication drop-down list:
- •
Use credentials of user to connect after Sign In at the control panel: Select Use credentials of user to connect after Sign In at the control panel, and then click Next.
-OR-
- •
Always use these credentials: Select Always use these credentials, enter the User name and Password, and then click Next.
- 5.
On the Configure E-mail Settings dialog, enter the following information about for the sender’s e-mail address, and then click Next.
NOTE:When setting up the From, Subject, and Message fields, if the User editable check box is unchecked, users will not be able to edit those fields at the printer control panel when sending an e-mail.
| Option |
Description |
|
From
(Required)
|
Select one of the following options from the From drop-down list:
- •
User’s address (sign-in required)
- •
Default From: Enter a default e-mail address and display name in the Default From E-mail Address and Default Display Name fields
 TIP:Create an e-mail account for the printer, and use this address for the default e-mail address.
TIP:Configure the e-mail feature so that users must sign in before using it. This prevents users from sending an e-mail from an
address that is not their own.
|
|
Subject
(Optional)
|
Provide a default subject line for the e-mail messages.
|
|
Message
(Optional)
|
Create a custom message.
To use this message for all e-mails sent from the printer, clear the User editable check box for Message.
|
- 6.
In the Configure File Scan Settings area, set the default scanning preferences, and then click Next.
| Option |
Description |
|
Default File Type
|
Select the default file type that the for the scanned document:
- •
- •
- •
- •
- •
- •
- •
- •
- •
- •
- •
- •
- •
|
|
Default Color Preferences
|
Select the default color setting for the scanned document:
|
|
Default Output Quality
|
Select the default output quality for the scanned document:
|
|
Default Resolution
|
Select the default scan resolution for the scanned document:
|
- 7.
Review the Summary area, and then click Finish to complete the setup.
Method two: Advanced configuration using the E-mail Setup
- 1.
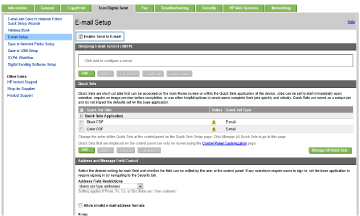
Using the EWS top navigation tabs, click Scan/Digital Send, and then click E-mail Setup in the left navigation pane.
- 2.
On the E-mail Setup dialog, select the Enable Send to E-mail check box. If this check box is not selected, the feature is unavailable at the product control panel.
- 3.
In the Outgoing E-mail Servers (SMTP) area, complete the steps for one of the following options:
- •
Select an existing server from the Outgoing E-mail Servers (SMTP) table.
-OR-
Click Add to start the SMTP wizard.
- 1.
In the SMTP wizard, select one of the following options:
- •
Option one: I know my SMTP server address or host name: Enter the address of an SMTP server, and then click Next.
- •
Option two: If you do not know the address of the SMTP server, select Search network for outgoing e-mail server, and then click Next. Select the server, and then click Next.
NOTE:If an SMTP server was already created for another product function, the Use a server already in use by another function option displays. Select this option, and then configure it to be used for the email function.
- 2.
On the Set the basic information necessary to connect to the server dialog, set the options to use, and then click Next.
NOTE:Some servers have problems sending or receiving emails that are larger than 5 megabytes (MB). These problems can be prevented
by entering a number in Split e-mails if larger than (MB).
NOTE:In most cases, the default port number does not need to be changed. However, when using the Enable SMTP SSL Protocol option, port 587 must be used.
NOTE:If you are using Google™ Gmail for email service, select the Enable SMTP SSL Protocol check box. Typically, for gmail, the SMTP address is smtp.gmail.com, port number 465, and the SSL should be enabled.
Please refer to online sources to confirm these server settings are current and valid at the time of configuration.
- 3.
On the Server Authentication Requirements dialog, select the option that describes the server’s authentication requirements:
- •
Server does not require authentication, and then click Next.
- •
Server requires authentication
- ◦
From the drop-down box, select Use credentials of user to connect after Sign In at the control panel, and then click Next.
- ◦
From the drop-down box, select Always use these credentials, enter the Username and Password, and then click Next.
NOTE:If using a signed-in user's credentials, set email to require sign in by the user on the product control panel. Deny device
guest access to email by clearing the check box for email in the Device Guest column in the Sign in and Permission Policies area on the Access Control dialog of the Security tab. The icon in the check box changes from a check mark to a lock.
- 4.
On the Server Usage dialog, choose the product functions that will send email through this SMTP server, and then click the Next button.
NOTE:If the server requires authentication, a user name and password for sending automatic alerts and reports from the product
will be required.
- 5.
On the Summary and Test dialog, enter a valid email address in the Send a test e-mail to: field, and then click Test.
- 6.
Verify that all of the settings are correct, and then click Finish to complete the outgoing email server set up.
- 4.
In the Quick Sets area, select one of the following options:
NOTE:Quick Sets are optional short-cut jobs that can be accessed on the main Home screen or within the Quick Sets application at
the product.
- •
Select an existing Quick Set under Quick Sets Application in the table.
-OR-
- •
Click Add to start the Quick Set Wizard. Complete the following information:
- ◦
Quick Set Title: Enter a title for the new Quick Set.
- ◦
Button Location: From the Button Location drop-down list, select either Home Screen or Quick Sets Application.
- ◦
Quick Set Description: Enter a description of the Quick Set.
- ◦
Quick Set Start Option: To set how the Quick Set starts, click either Enter application, and then user presses Start or Start instantly upon selection.
- 5.
In the Address and Message Field Control area, enter a Default From: setting and any of the other optional settings.
Address and Message Field Control settings:
| Feature |
Description |
|
Address Field Restrictions
|
Specify whether users must select an email address from an address book or whether users are allowed to enter in an email
address manually.
 CAUTION:If Users must select from address book is selected, and any of the address fields are also set as User editable, changes to those editable fields also change the corresponding values in the address book.
To prevent users from changing contacts in the Address Book at the product control panel, go to the Access Control page on the Security tab, and deny Device Guest access to address book modifications.
|
|
Allow invalid e-mail address formats
|
Select to allow an invalid email address format.
|
|
User editable
|
To use the Default From address and Default Display Name for all emails sent from this product (unless a user is signed in), do not select the User editable check box.
When setting up the address fields, if the User editable check box is unchecked, users will not be able to edit those fields at the product control panel when sending an email. For
send-to-me functionality, clear the User editable check boxes for all of the address fields, including the From: To: CC:, and BCC: fields, and then set that user's send email From: their own email address and To: their own email address.
|
|
Default From: and Default Display Name:
|
Provide an email address and name to use for the From: address for the email message.
TIP:Create an email account for the product, and use this address for the default email address.
TIP:Configure the email feature so that users must sign in before using it. This prevents users from sending an email from an
address that is not their own.
|
|
To:
|
Provide a To (recipient) email address for emails.
|
|
CC:
|
Provide a CC email address for emails.
|
|
BCC:
|
Provide a BCC email address for emails.
|
|
Subject:
|
Provide a default subject line for the email messages.
|
|
Message:
|
Create a custom message. To use this message for all emails sent from the product, clear or do not select the User editable check box for Message:.
|
- 6.
In the Signing and Encryption area, set the signing and encryption preferences.
Signing and Encryption settings:
| Feature |
Description |
|
Signing
|
Select whether to sign the security certificate.
Select the User editable check box to make this setting editable at the product control panel.
|
|
Hashing Algorithm
|
Select the algorithm to use for signing the certificate.
|
|
Encryption
|
Select whether to encrypt the email.
Select the User editable check box to make this setting editable at the product control panel.
|
|
Encryption Algorithm
|
Select the algorithm to use for encrypting the email.
|
|
Attribute for Recipient Public Key
|
Enter which attribute to use to retrieve the recipient’s public key certificate from LDAP.
|
|
Use the recipient public key certificate to verify the recipient
|
Select this setting to use the recipient’s public key certificate to verify the recipient.
|
- 7.
In the Notification Settings area, select when users will receive notifications about sent emails. The default setting is using the signed in user's email
address. If the recipient email address is blank, no notification is sent.
- 8.
In the Scan Settings area, set the default scanning preferences.
Scan settings:
| Feature |
Description |
|
Original Size
|
Select the page size of the original document.
|
|
Original Sides
|
Select whether the original document is single-sided or double-sided.
|
|
Optimize Text/Picture
|
Select to optimize for the output of a particular type of content, or select Manually adjust.
|
|
Optimize For
|
This setting is only available when Optimize Text/Picture is set to Manually adjust. Select a manual-adjust value.
|
|
Content Orientation
|
Select the way the content of the original document is placed on the page: Portrait or Landscape, or select Automatically detect.
|
|
2–Sided Format
|
This setting is not available when Content Orientation is set to Automatically detect. Select to describe the binding of the page to specify if the back side of the page is upside down or right side up.
|
|
Background Cleanup
|
Select a value to remove faint images from the background or to remove a light background color.
|
|
Darkness
|
Select a value to adjust the darkness of the file.
|
|
Contrast
|
Select a value to adjust the contrast of the file.
|
|
Sharpness
|
Select a value to adjust the sharpness of the file.
|
|
Image Preview
|
Select whether to require or make optional a displayed preview of the job or to disable a preview.
|
|
Cropping Options
|
Select whether or not to allow a job to be cropped and the type of cropping option.
|
|
Job Build
|
Select this setting to combine several sets of original documents into one email attachment. Also, use this setting to scan
an original document that has more pages than the document feeder can accommodate at one time.
|
|
Automatic Tone
|
Select this setting to set to automatic the Darkness, Contrast, and Background cleanup settings, which then makes these settings unavailable on this page.
|
|
Multi-feed Detection
|
Select this setting to enable detection of multi-feed jobs.
|
|
Erase Edges
|
Select this setting to specify the width of edge margins to be erased, in either inches or millimeters, for the front side
and back side of a job.
|
- 9.
In the File Settings area, set the default file settings preferences.
File settings:
| Feature |
Description |
|
File Name Prefix
|
Set the default file name prefix used for files saved to a network folder.
|
|
Default File Name
|
Default file name for the file to be saved.
Select the User editable check box to make this setting editable at the product control panel.
|
|
File Name Suffix
|
Set the default file name suffix used for files saved to a network folder.
Duplicate filename suffix default [filename]_YYYYMMDDT
|
|
File Number Format
|
Select a file name format for when the job is divided into multiple files.
|
|
Default File Type
|
Select the file format for the saved file.
Select the User editable check box to make this setting editable at the product control panel.
|
|
File Name Preview
|
Enter a file name, and then click the Update Preview button.
|
|
Default Color Preference
|
Select whether the file is in black & white or in color.
|
|
Default Output Quality
|
Select the quality for the file. Higher-quality images require a larger file size than lower-quality images, and they take
more time to send.
|
|
Default Resolution
|
Set the resolution for the file. Higher resolution images have more dots per inch (dpi), so they show more detail. Lower resolution
images have fewer dots per inch and show less detail, but the file size is smaller.
|
|
Compression
|
Specify if the file uses Normal or High compression when saving a scanned document as a PDF or XPS file. If compression is
set to High, the scanned file is smaller, but the scanning process might take longer than Normal compression.
|
|
Black TIFF Compression
|
Select the black TIFF compression algorithm to be used to compress the generated TIFF file.
|
|
Color/Grayscale TIFF Compression
|
Select the color/grayscale TIFF compression algorithm to be used to compress the generated TIFF file.
|
|
PDF encryption
|
If the file type is PDF, then this option encrypts the output PDF file. A password must be specified as part of the encryption.
The same password must be used to open the file. The user will be prompted to enter a password prior to scanning their job
if one has not been set prior to pressing start.
|
|
Disable OCR file types
|
Select this setting to prevent OCR file types from being available from the product control panel.
|
|
Enable Blank Page Suppression
|
If the Enable Blank Page Suppression option is enabled, blank pages will be ignored.
|
- 10.
Review the selected options to verify that they are accurate, and then click Apply to complete the setup.
Step four: Configure the Quick Sets (optional)
Quick Sets are optional short-cut jobs that can be accessed on the main Home screen or within the Quick Sets application at
the printer.
- 1.
In the Quick Sets area, select one of the following options:
Select an existing Quick Set under Quick Sets Application in the table.
-OR-
Click Add to start the Quick Set Wizard.
- 2.
If you selected Add, the Quick Set Wizard opens. Complete the following information:
- •
Quick Set Title: Enter a title for the new Quick Set.
- •
Button Location: From the Button Location drop-down list, select either Home Screen or Quick Sets Application.
- •
Quick Set Description: Enter a description of the Quick Set.
- •
Quick Set Start Option: To set how the Quick Set starts, click either Enter application, and then user presses Start or Start instantly upon selection.
Step five: Set up Send to E-mail to use Office 365 Outlook (optional)
Microsoft Office 365 Outlook is a cloud-based e-mail system provided by Microsoft which uses Microsoft's Simple Mail Transfer
Protocol (SMTP) server to send or receive e-mails. Complete the following to enable the printer to send an e-mail with an
Office 365 Outlook account from the control panel.
NOTE:You must have an e-mail address account with Office 365 Outlook to configure the settings in the EWS.
Configure the outgoing e-mail server (SMTP) to send an e-mail from an Office 365 Outlook account
- 1.
Using the EWS top navigation tabs, click Networking.
- 2.
In the left navigation pane, click TCP/IP Settings.
- 3.
In the TCP/IP Settings area, click the Network Identification tab.
- 4.
If DNS is required on the network, in the TCP/IP Domain Suffix area, verify that the DNS suffix for the e-mail client being used is listed. DNS suffixes have this format: companyname.com, Gmail.com, etc.
NOTE:If the Domain Name suffix is not set up, use the IP address.
- 5.
- 6.
Click the Scan/Digital Send tab.
- 7.
On the left navigation pane, click E-mail Setup.
- 8.
On the E-mail Setup page, select the Enable Send to E-mail check box. If this check box is not available, the feature is unavailable at the printer control panel.
- 9.
In the Outgoing E-mail Servers (SMTP) area, click Add to start the SMTP wizard.
- 10.
In the I know my SMTP server address or host name field, type smtp.onoffice.com, and then click Next.
- 11.
On the Set the basic information necessary to connect to the server dialog, in the Port Number field, type 587.
NOTE:Some servers have problems sending or receiving e-mails that are larger than 5 megabytes (MB). These problems can be prevented
by entering a number in Split e-mails if larger than (MB).
- 12.
Select the Enable SMTP SSL Protocol check box, and then click Next.
- 13.
On the Server Authentication Requirements dialog, complete the following information:
- a.
Select Server requires authentication.
- b.
From the drop-down list, select Always use these credentials
- c.
In the Username field, type the Office 365 Outlook e-mail address.
- d.
In the Password field, type the Office 365 Outlook account password, and then click Next.
- 14.
On the Server Usage dialog, choose the printer functions that will send e-mail through this SMTP server, and then click the Next button.
- 15.
On the Summary and Test dialog, enter a valid e-mail address in the Send a test e-mail to: field, and then click Test.
- 16.
Verify that all of the settings are correct, and then click Finish to complete the outgoing e-mail server set up.